SSU3A Training - Editing a 'Weebly' Website
This page takes you through the basic steps to edit a 'Weebly' webpage - such as your Interest Group page on this site - and to set up your own (free!) website in Weebly on which to practice. See below and send me an email (Richard Batchelor) if you want to undertake this simple training.
TRAINEES MUST NOT EDIT THIS LIVE WEBSITE.
YOU MUST USE THE TRAINING WEBSITE, OR SET UP YOUR OWN PERSONAL WEEBLY WEBSITE TO PRACTICE THE EXERCISES IN THIS TRAINING COURSE.
YOU MUST USE THE TRAINING WEBSITE, OR SET UP YOUR OWN PERSONAL WEEBLY WEBSITE TO PRACTICE THE EXERCISES IN THIS TRAINING COURSE.
INTRODUCTION
Any ssu3a member may apply to undertake this training.
This short training course has been developed to enable members of South Solihull u3a to learn how to make simple additions and changes to interest group pages on the ssu3a website. When the training has been completed, you will be given access to the relevant ssu3a page(s), and you will also have your own Weebly account enabling to build your very own website, to practice on. The training course has been posted here on the ssu3a website - using Weebly of course - and thus serves as a demonstration of what can readily be done with the techniques shown in the course.
The training may be used as 'distance learning' - meaning you can follow the instructions in your own place and time. It is not that difficult to learn. Should you be less confident, or find there are things that you don’t understand, we will be running short courses 'live' where you can try the steps under supervision and guidance, and ask any questions you have.
"Can I do this on my iPad?" Weebly is best tackled using a personal computer (laptop or desk top). I have an Apple MacBook, which does the same things slightly differently sometimes. It should be possible to do the simple things you will want to do and covered below on an i-Pad, but you would need to download the Weebly App. I haven't got access to a new enough iPad, so I'm looking for a guinea pig to work through the sign-up before releasing that part of this training!
PRELIMINARY STEPS
First, have a look through the training on this page. Then send an email to me Richard Batchelor asking to be enrolled for the training - and ask any questions arising so far.
At this point, let's just be clear that there are three websites involved in this training:
1. The one you are on now - the South Solihull u3a website. You will in due course be given permission to edit certain pages of this site. BUT YOU MUST NOT ATTEMPT TO EDIT IT UNTIL YOUR TRAINING IS COMPLETE.
2. A training site at https://ssu3atraining.weebly.com/. You will be editing this site as an exercise on this course
3. The Weebly website, the website you go to to edit the content of the training site. (On an iPad this will be the Weebly App rather than a website).
My preliminary step has been to set up the training site at https://ssu3atraining.weebly.com (Click on this link and open it to have a look). The idea is you can practice on this site where it doesn’t matter if it all goes wrong - I can mend it and non-one will be inconvenienced as they might be on a live site.
On receipt of your email, I will use your address and I will set you up as an Editor of the training site and set up your own practice page. There are two levels of Editor: the higher level is Administrator, meaning you will be allowed to do anything I can do on the site. The second level is Author, where you are restricted to working on designated pages of a website. When you are invited to edit the real ssu3a site, you will probably be an Author, restricted to your particular interest group pages. For this training you will be given full Administrator access to the training website
Anyway, you will receive an email (OK from Mrs K Batchelor rather than me - that's what Weebly calls our joint email: enough said!) - and the email should look like this:-
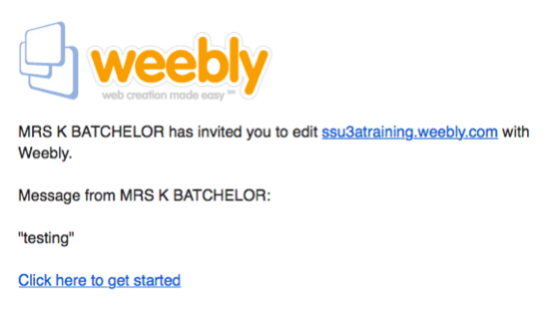
….which shows you the address of the training website and invites you to “click here to get started”
CREATE AN ACCOUNT
When you 'click here to get started' you will be redirected to the Weebly website and see:-
When you 'click here to get started' you will be redirected to the Weebly website and see:-
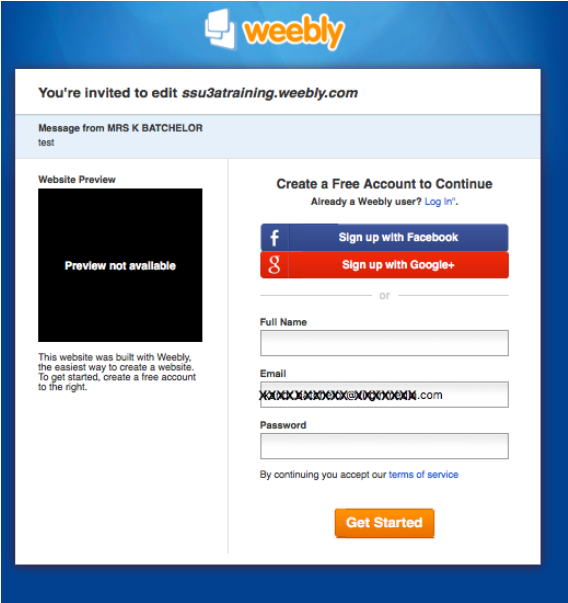
Add the details requested - your name and a password - and click 'Get Started'
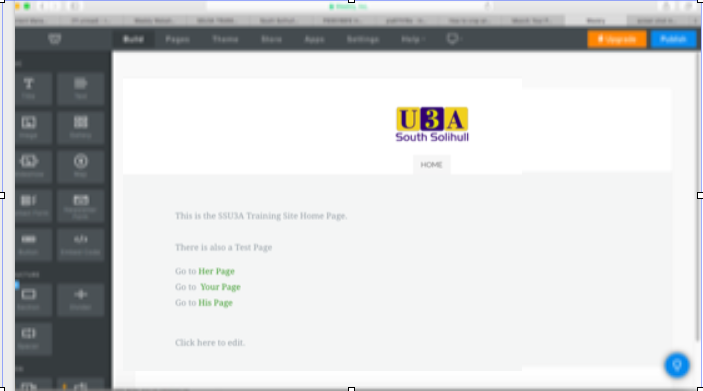
That will take you to the editing page of the Weebly website where you will see something like the screenshot here - the home page of the site shown ready for editing with your page in a list (you can also see your page by hovering the mouse over the 'Home' button just below the ssu3a logo). There are also a number of buttons for editing at the top and down the left side
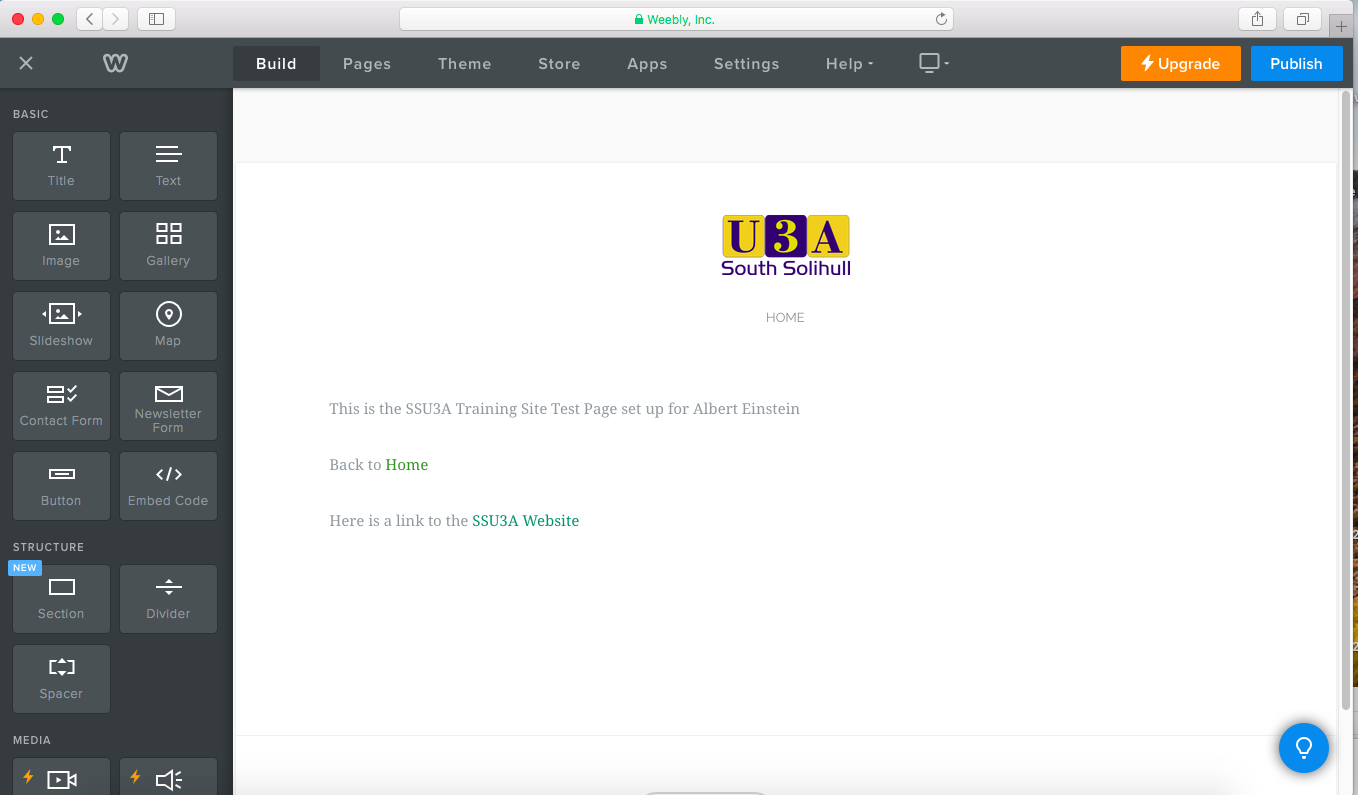
Click on 'Your page' ( I will have changed the link so you see your name there of course) and go to that page. It will look like this:-

START EDITING YOU SITE
... So first click by the 'Xxxxx' text and delete it, and type in your own name on your own page!
Next let's make a link to another page. The website says "Back to Home" - but I've just typed that in for you. We want to be able to click on 'Home' and get back to the home page of the test site. To do this, highlight the word 'Home' by clicking by it, holding the mouse left button down and dragging over the word), Now you will have noticed that when you are 'clicked' inside the text area that a black formatting bar appears. So now you have the text highlighted, click on the chain symbol to get a dialogue box to create a link. In the dialogue box, in this instance click on 'Standard Page' - you will see a list of all the pages on the training site. Click on 'Home' in the dialogue box, then click on the 'Home' you highlighted on the page and then click a little way away from the text......
........Oh no! the word 'Home' has disappeared! Don't worry, this doesn't always happen, but the 'style' of this website has this quirk. We can fix it. First click the mouse where the word was - and you will find there is a link - you could go to the home page, but don't do that yet: highlight the text by dragging the mouse over it as before, and you will see it re-appear. While it is highlighted, go to the formatting bar where you made the link and click the down arrow next to the 'A' - you will see it says it's to change [font] colour when you get there. Click on a colour - best a bold one: I chose the bright green in the right hand column. The word 'Home' should now be clearly visible in that colour, and you can now click it and follow the link to the home page and come back to your page again from there as when you first got to the site. Well done!
Hang on - we haven't actually edited the site everyone can see yet! We have set up some changes, and now we need to load them onto the training site at https://ssu3atraining.weebly.com/. This is very simple: click the blue 'Publish' button at the top right corner of the window.......
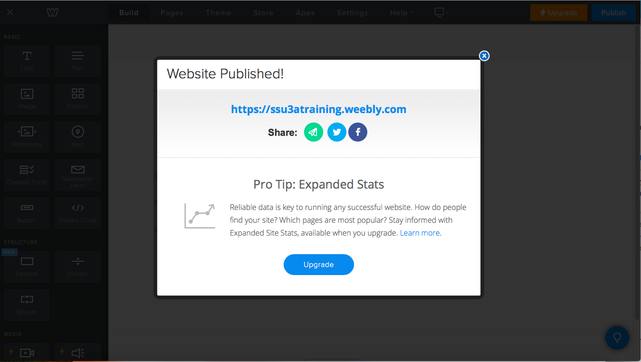
...and the website will be published! Close the window by clicking the cross in the blue circle top right: don't click 'upgrade' or Weebly will sell you premium access - we have a premium account for the ssu3a website, but I've not found the need to upgrade (cheapskate!). Check out that the changes you have made have indeed been uploaded to the training website at https://ssu3atraining.weebly.com. If you already have the website open, you will not see the changes, because your computer will continue to show you what it did before and will not reload what it is showing you from the host website until you ask it. Do that by clicking the circle arrow the very top of your screen next to https://ssu3atraining.weebly.com.. (or close the training website tab / window and reopen it).
ADD TEXT ELEMENTS
Go back to Weebly to do some more editing. Check that 'Build' is highlighted at the top of the page, and click on and drag the 'Text' button onto the lower part of the page and release it. Hover over 'Click here to edit' and you will see you have a narrow text box across the page. You can type in this box - or let's try copying the following and pasting the following into the box:
15th June 2018 The Modern and the Postmodern (Part 2) Week 1.
We will discuss the first topic of this MOOC: "Intensity and the Ordinary: Sex, Death, Aggression and Guilt", It is about Freud.
Hmm, what's that about? Well never mind the content, it's a notice of a forthcoming meeting, so click on and drag the 'Title' button onto the page and drop it just above the text you've just entered. Copy and paste in:
Our Next Meeting.
You can try changing the words in the text box, or how they look. Drag across the top line of the text (15th June....) to highlight it. Now in the black formatting bar, click the 'B' on the left and make the text bold. Now click '+' to make it bigger. Maybe we don't need the title? Click the mouse outside the text box - well below it, then hover the mouse over the title text ('Our Next Meeting'). You will see the outline of the title box in blue. If you slide the mouse across (stay within the box) to the middle then up into the white button with the eight blue dots. you can drag the title box around - maybe pull it below the text box, just for fun! It looks silly there, so hover inside it again, slide the mouse all the way to the right hand side of the box and over the 'x' which will now turn red. Click the red x to delete the title box.
ADD A PICTURE
You may wish to put a photograph or some other image on the website. Try the logo below. On my MacBook I right clicked on the logo and downloaded it. It went to my "Downloads" folder - the most recent file. On a Windows PC, right click on the logo and click 'Save Picture as', give it some title and choose a folder - maybe your desktop as we are about to use it.. Go back to Weebly to add this image to your page on the training website. This time instead of dragging in a Title or Text box, click on the black 'Image' button and drag that in.. Click on 'Upload Image' then on 'Upload a photo from your computer'. Find, select and choose the logo image you just downloaded
You may wish to put a photograph or some other image on the website. Try the logo below. On my MacBook I right clicked on the logo and downloaded it. It went to my "Downloads" folder - the most recent file. On a Windows PC, right click on the logo and click 'Save Picture as', give it some title and choose a folder - maybe your desktop as we are about to use it.. Go back to Weebly to add this image to your page on the training website. This time instead of dragging in a Title or Text box, click on the black 'Image' button and drag that in.. Click on 'Upload Image' then on 'Upload a photo from your computer'. Find, select and choose the logo image you just downloaded

Let's 'publish' our changes again, then open or refresh your page on the training site.
You don't have to use the logo for this exercise - in fact choose one of your own photos and upload it. But before you do, it is as well to check the size of the file, Image files, particularly photographs, are often very large, so that you could make high quality printed enlargements if you wanted to: but a much coarser resolution is quite adequate for an image on a website -and it takes up less memory space and doesn't take a long time to load. While a photograph may be well over a megabyte (MB) and be more than 2000 pixels wide, the general consensus is that around 640 pixels is quite adequate to display an image across the screen, and that will bring the file size down below 100KB. If you want a smaller image on screen, reduce the image size proportionally. Try this example first - it's a 'Recent Photograph' from this website:
You don't have to use the logo for this exercise - in fact choose one of your own photos and upload it. But before you do, it is as well to check the size of the file, Image files, particularly photographs, are often very large, so that you could make high quality printed enlargements if you wanted to: but a much coarser resolution is quite adequate for an image on a website -and it takes up less memory space and doesn't take a long time to load. While a photograph may be well over a megabyte (MB) and be more than 2000 pixels wide, the general consensus is that around 640 pixels is quite adequate to display an image across the screen, and that will bring the file size down below 100KB. If you want a smaller image on screen, reduce the image size proportionally. Try this example first - it's a 'Recent Photograph' from this website:

On a MacBook: Again, download it to your 'Downloads' folder. You can go to the Downloads folder through Finder, double click the latest file and the image will open in Preview.. In the Tools Menu, click Adjust Size, and and you will see the image is 1133 x 614 pixels and takes up 244KB of memory. That's not excessive, but change the width to 640: with Scale Proportionally ticked, the height will change to 347 and file size drops to 95KB - within the 100KB target. But does it look any different? Click OK to apply the size reduction and close the file (it's still in the downloads folder at this new size). On your page on the Training Site click on the black 'Image' button and drag that in.. Click on 'Upload Image' then on 'Upload a photo from your computer' and upload or drag in the reduced image from your downloads folder. You will then need to drag the bottom right corner of the image to make it fill the screen (or the image box at least).
On Windows: right click on the first picture and click ‘Save Picture as’, name it and put it in a file or on the desktop as for the logo. Open 'Paint': Paint offers a very straightforward approach to resizing images, similar to the MacBook process above. In Paint, find and open your image. On the Home tab of the Paint toolbar, click the 'Resize' button. Select 'Resize By Pixels', make sure 'Maintain Aspect Ratio' is ticked, and change Horizontal to 640. The Vertical pixels should change proportionally. Click 'OK' and 'Save' (or 'Save as') the resized photograph. Alternatively, you could just 'Resize By Percentage' and try a few percentages to get the Horizontal to the right sort of figure. Either way, upload the resized photograph to your page on the Training Website as described above.

'
The picture is quite adequate, even when 'stretched' bigger again as here. The original file here wasn't excessively large, but a photograph can be several megabytes, and a less than a hundred kilobytes version will usually be quite sufficient - and you can go smaller if the image is a thumbnail or, say, one third of the screen width: 320 x 240 pixels will do it and the file size comes down to 25kB.
As an extra exercise, repeat the re-sizing process above and take the image down to 320 pixels wide. If you upload that and make the image fill the screen, you will see the picture 'pixelate'. Now drag another image tile onto the page and then drag a text tile and see if you can't drop it exactly to the right of the image box. You should get the two boxes to sit side by side. upload the image to this image box and you will see it is quite adequate when smaller - and you could use the text box to say something about the picture you have loaded.
Now try one of your own pictures? Oh, do make a copy of your picture and work on that for the website, so you don't lose the original high resolution version of your original photograph!
However you got there 'Publish' your modified page on the training website (Click the blue 'Publish' button top right), and go to the training website to check the result.
STANDARDS
On the live ssu3a website, we try to keep everything neat and tidy, and as consistent from page-to-page as possible. To this end there is a document describing the preferred format of each type of element. When you edit a page, and especially if you create a new element, please try to follow the standards. You can find a link to the document on the I.T. Documents page.
On the live ssu3a website, we try to keep everything neat and tidy, and as consistent from page-to-page as possible. To this end there is a document describing the preferred format of each type of element. When you edit a page, and especially if you create a new element, please try to follow the standards. You can find a link to the document on the I.T. Documents page.
ALL DONE?
I hope you have got this far successfully, and feel confident to use Weebly. If not, or if you have questions, please contact me and I'll try to help.
Richard
I hope you have got this far successfully, and feel confident to use Weebly. If not, or if you have questions, please contact me and I'll try to help.
Richard
